

Begin with a concrete plan: start the North Island and commit to about 65 days, covering roughly 1,000–1,100 km, walking 20–22 km a day with a built-in rest week every 9–11 days. This ambitious setup keeps you on the trail while accommodating weather windows and island variety, and it gives you milestones youve likely heard about from hikers. A well managed schedule can keep you moving without burnout, and it tells you exactly how to pace your days.
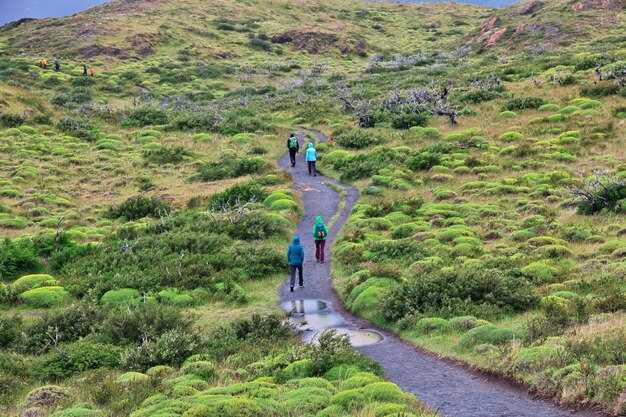
On the North Island, the terrain blends coast and crater paths. Expect roughly 1,000–1,100 km of terrain, with ferry hops and a few volcanic ascents near Tongariro. You’ll walk with clouds drifting over cliffs and spray from the sea, and you can plan a dish stop in Hawke’s Bay to refuel. If you time it right, a weekend in a vineyards cellar door gives you a memorable taste of local life outside the city, and the talk with locals often leads to practical tips.
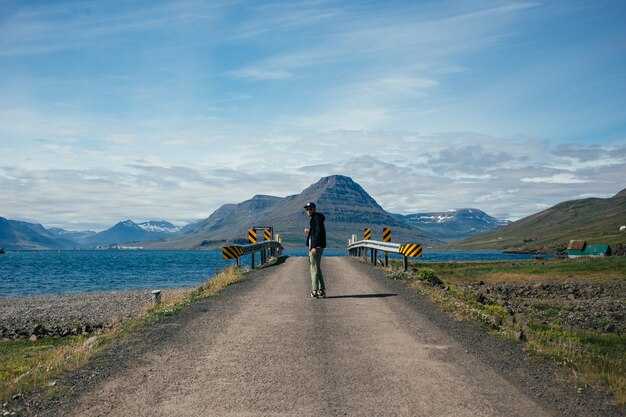
The South Island leg introduces alpine passes and remote coastline. It runs roughly 1,600–1,700 km, so expect 60–85 days at 20–25 km per day, with flexible windows for weather. This section tests your stamina while delivering blank skies, clouds over the Southern Alps, and memorable vistas. Marlborough and Canterbury offer opportunities to visit vineyards again and enjoy fresh regional dishes; you would notice that the pace dictates how much you actually relax at huts or in coastal towns.
As a writer, I would suggest treating each day as a short chapter. Carry a light notebook to capture stories from people you meet, and the memorable moments that emerge while you walk. Making smart pacing decisions matters: if you hit a stretch with wind from the outside and rain, adjust your plan and keep going in the gentler sections. Ask locals about the best campsites, plan with a margin, and talk with fellow walkers to learn about water sources, ferry timetables, and huts; you’ll find that knowledge is clearly more valuable than gear specs. If you need only a few weeks, choose one island and return later for a second season; this lets you plan exactly how to pace your days and actually finish with confidence.
To start strong, pick a coastal segment of the North Island first, with huts and towns within easy reach, then extend as you gain confidence. This outside life offers memorable moments, clouds over the peaks, and real stories you can tell when you reach the end of the day. Each evening brings a small happening–a hut chat, a shared dish, or a quiet sunset–reminding you why this path matters. The pace stays steady, the company stays friendly, and the landscape keeps delivering.
Seasonal Planning: Best Weather Windows for North and South Island Crossing
Target two stable windows: November through early December, and March through early April. In these periods, high-pressure systems often sit overhead for several days, delivering clear days, light nights, and predictable winds along coastal and inland routes. For ferries and off-trail crossings alike, this pattern lets you keep a steady pace without chasing sudden fronts that can upend plans. You’ll notice the green hills brighten after rain, and you can write your notes with fewer interruptions from squalls. If you rested recently, you’ll see mornings feel fresher, breaths clearer, and the whole route tighten into a smooth, logical flow.
The North Island benefits from these windows by allowing longer stretches across varied terrains–from volcanic highs to forested flats along lakes and rivers. In practice, any plan that centers on late November through early December, or late February through early April, tends to yield fewer storms over exposed ridges. Mountain sections stay cold but manageable with a solid layer system, and you can bank on calmer seas for coastal legs where tides push and pull along sandy banks and lakeside flats. That said, mountains can sharpen winds quickly, so have a fast-responding plan to swap days when a front lingers. Its all about turning a potentially tricky forecast into a clean set of days to move, which clearly reduces risk and fatigue.
North Island Window
Best bets are the mid-to-late November period and the early April span when high-pressure ridges dominate inland routes and maritime crossings alike. In these weeks, you can expect daytime highs around 15–20°C in sheltered valleys, with nights dipping to near 5–10°C at altitude. The longer days help you maintain a steady rhythm along tracks that pass by green pastures, along riverbanks, and past small settlements where locals share tips and fresh day-boat catches. A practical approach is to reserve at least two contingency days for unsettled spells, especially after strong winds that bounce off the mountains and harden at night. If you’re coordinating flights to bridge a layover, you’ll often find smoother schedules in these windows, which reduces time spent waiting in towns with cafés and little bakeries after long days on the go. Keep a close eye on fronts from the west–they move fast and can push dust into valleys and lakes, changing the feel of a route in hours, not days. Thoughtful packing for a range of conditions from sun to sleet helps you become nimble rather than stuck, and you’ll notice your pace smooths as routines fall into place. For those with Asian or Asian-inspired itineraries, you can weave in a few short side trips along the coast without losing your core plan, and you may even sample a local recipe or two in a lodge kitchen before a night on a balcony with views of the hills and the banked fire. This flexibility keeps your plan from becoming rigid and lets you spend more time breathing the clean air rather than chasing weather.
South Island Window
South Island crossings, including Cook Strait legs and alpine approaches, shine in the late spring and early autumn windows. Expect long, dry spells of 5–9 days with daytime temperatures from 12–18°C and cool to cold nights, especially in the high country where winds can gust along ridgelines. South Island routes pass by high mountains, glacial lakes, and wild rivers; planning these lines to ride the calm between fronts minimizes exposure on exposed shelves and saddle paths. If you’re watching the forecast, you’ll notice that nights stay clear during settled spells, which makes stargazing and early starts appealing. Should a front appear, you can fall back on flexible days, allowing you to switch between a high-altitude traverse and the sheltered valley tracks–a move that keeps you moving instead of waiting. For a practical edge, arrange flights as a backup when seas on Cook Strait look unsettled; a short hop can save a day and preserve your momentum. In practice, you’ll see that a well-timed window reduces fatigue, keeps temperatures comfortable, and maintains a rhythm that feels almost like a well-edited dish–simple, focused, and satisfying. Its a pattern that many trekkers, from locals to visitors like Samuelsson or travelers with Nordic backgrounds, have followed to finish the crossing without overheating or cooling off too quickly. You’ll notice how the days become longer, the air cleaner, and the whole trip more cohesive as you move along the lakes and into the mountains, and you’ll carry that sense of calm with you in every breath.
Route Options Across NZ: Distances, Terrain, and Daily Milestones
Begin with Tongariro as your alpine prelude, then tackle the North Island leg from Cape Reinga to Wellington before finishing on the South Island from Picton to Bluff. This split aligns with terrain shifts and seasonal windows, keeps daily goals sensible, and lets you reserve hotel stops after tougher sections. The Tongariro section features steam vents and volcanic vistas that literally up the adrenaline, giving you a savory kickoff to the bigger trek ahead.
Te Araroa runs roughly 3,000 km in total. Coastal days typically run 20–28 km; rugged alpine or forest segments drop to 12–18 km. Plan about 4–6 months for the full route, with periodic trips to towns for resupply and rest. Expect a little variation between island sections: the North Island leans coastal and volcanic, the South Island leans alpine and fjord-dense. You could carry a lighter pack after a few mail drops, and you always want space for a tiny detour to explore a side track or a little village. If you want to pace smarter, schedule hotel stops for a zero day every 10–14 days and call ahead to book huts or guesthouses in advance. Also, dont overlook the option to mix in short trips to nearby towns for a culinary break–savory options abound, from Asia-inspired snacks to Taipei-style noodle stops near larger towns. Havent to rush the experience; could a slower pace yield sharper photos and better weather windows? Think through your plan and adjust as you go.
North Island Options
The North Island itinerary anchors on Tongariro, then trails toward coastal and subalpine zones. Expect volcanic plateaus, dense forests, and scenic beaches. Daily targets average 20–28 km on smoother sections and 12–18 km on tougher climbs. Practical stops include national parks, small towns with hotels, and refuges where available. The most reliable timing centers on spring or autumn weather, with occasional heat in summer coastal stretches. If you want to shorten fatigue, split the North Island into a Tongariro-friendly start, a mid-island coastal leg, and a Wellington entry–this keeps you looking forward to the next hotel, cafe, or talk with a local ranger. For gear, plan to carry a medium-weight pack and keep a spare space in your suitcase for souvenirs from Lale Café or a small, little detour to a fellow traveler’s recommendation. You could also schedule a Taipei-inspired meal stop to reset flavor balance after a few long days.
| Segment | Approx Distance (km) | Terrain Highlights | Daily Milestone (km) | Notable Stops / Notes |
|---|---|---|---|---|
| Tongariro Alpine Prelude | 19.4 | Volcanic highlands, scree, lava fields | 15–20 | National Park base town, hotel options nearby |
| Coastal North Island Loop | 1,200–1,600 | Beaches, coastal cliffs, mangroves, forests | 20–28 | Bay of Islands to Auckland corridor; call ahead for huts or lodges |
South Island Options
The South Island leg emphasizes alpine passes, beech forests, glacial valleys, and dramatic fjords. Daily targets average 18–25 km on gentle terrain and tighten to 12–18 km through steeper passes. Key hubs include Picton, Hokitika, and Wanaka, each offering hotels and cozy lodges to reset. Weather windows are more variable here, so plan extra contingency days for storm fronts or high wind. If adrenaline pushes you, schedule a few high-alpine days when the sun is out; if you want a steadier pace, place more zero days in towns to rest and reframe meals. A little detour to a Dakota Inn or a Detroit-style pizza shop can become a memorable midpoint break. For food logistics, stock up in larger towns and enjoy a savory mix of local produce and international flavors; you’ll literally find options that suit every taste, from hearty soups to lighter, savory salads.
| Segment | Approx Distance (km) | Terrain Highlights | Daily Milestone (km) | Notable Stops / Notes |
|---|---|---|---|---|
| Picton to Kaikōura Coast | 600–850 | Coastal trails, limestone valleys, wind-swept beaches | 20–28 | Coastal hotels, little towns; space for a day off in Kaikōura |
| Queenstown to Bluff Corridor | 1,000–1,800 | Alpine passes, beech forests, fjord scenery | 18–25 | Resupply towns, lodges, and huts; adrenaline stops for scenic overlooks |
Gear and Packing: Light, Weather-Resilient Must-Haves for an Island Trek
Pack a 40-liter, roll-top pack and a compact, weatherproof shell; add a 600–850 g quilt, a small stove kit, and two dry bags to keep clothes and electronics dry. This setup keeps weight manageable while you navigate oceans and the long trails towards inland terrain.
Clothing centers on layering: two sets of merino base layers, one lightweight fleece, and a rain shell rated at 10,000 mm or more. Include a yellow sun hat for visibility on exposed sections, three pairs of socks, and gaiters for mud and salt spray along coastal terrain. Pack a compact insulation layer for chilly mornings and a lightweight down vest for shoulder-season days. This system allows rapid adaptation to sun, wind, or rain, and perhaps you’ll discover you can wear fewer layers on milder days.
Footwear and protection: choose breathable, waterproof boots or trail runners with good grip and toe protection; bring two pairs of laces. A lightweight sleeping pad (4–6 mm) adds comfort on uneven ground. For shelter, carry a tarp or ultralight tent with stakes; a 1–2 L water reservoir and a compact filter. A small headlamp with spare batteries helps after dark. Keep five micro-spares strapped: spare headlamp, spare battery, spare thermal layer, spare socks, spare tarp.
Navigation and safety: carry a compact map and compass; dont rely solely on phone GPS where signal fades. A 10,000 mAh power bank sustains a GPS device and phone; keep a basic first-aid kit and a whistle. Consider a lightweight personal locator beacon for overseas sections or remote areas. Note entry points to huts along routes and carry bright, high-visibility gear so you stand out in fog along the coast. A simple philosophy keeps five lives covered: light, warmth, water, protection, and visibility. Perhaps you’ll find that avoiding conventional overpacking habits helps you stay nimble.
Packing strategy matters: distribute weight so heavier items stay near your spine and strapped the load securely. Keep water and snacks in easy reach; place the stove and fuel in the side pockets for quick access. This approach suits zealanders and others crossing the southeast coast; there are many entry options and you’ll learn to adjust. If youve tested your kit, you know which items you can leave behind; youve got this and the country will thank you for moving with care. Others there, theyve learned to adapt.
Real-world notes: choose gear that’s made to last, and test it in a dry run near a lake or beach before setting off. detroit-made fabrics or taipei-inspired membranes may influence your choice, and you can compare two jackets side by side. Find a class of gear that fits your pace–the grid of coastlines and trails there, from the southeast to the islands, rewards practical, resilient setups. You belong here–the country, the oceans, and the trails call you forward. There’s no need to rush; know your limits and thank the wind for a safe end to the day. Some gear comes from detroit and taipei; you can compare.
Safety and Navigation: Handling River Crossings, Weather Shifts, and Emergencies
Cross a river only when you can clearly see the bottom and the current is slow enough to control your movement; if not, pause, reassess, and seek a safer route. This mindset keeps your thru-hike on track and protects you in remote sections where islands and coasts can surprise you.
River crossings
- Evaluate the scene from the bank: check water depth, current speed, and any debris. If water covers your knee height or shows a fast swirl, don’t cross.
- Scout two to three meters upstream or downstream for a better bed and gentler flow. Look for rocks, stable footing, and a clear path across.
- Prepare gear for a controlled crossing: loosen hip belt, remove loose straps, secure valuables in dry bags, and keep your pack hugged to your chest with a stern anchor point.
- Cross with a buddy whenever possible. Face downstream, move in sync, and use trekking poles or a rope if available. Take short steps, maintain three points of contact, and keep low center of gravity.
- After crossing, dry your feet and inspect shoes for grit or hidden slips. Re-tie laces and re-pack so nothing shifts as you move on toward the next segment of the route.
Weather shifts
- Check the forecast at least 24 hours ahead and refresh before a key river or summit crossing. In the field, watch for darkening skies, sudden wind picks, and a drop in temperature–these signal evolving conditions.
- Set clear thresholds: if rain forecast exceeds moderate levels or wind gusts push 50–60 km/h, adjust your plan, shorten the day, or seek a sheltered campsite or hotel option if feasible.
- Know the signs of flash floods and rapidly rising water: murkier water, louder currents, and a rising waterline on banks. If any appear, halt progress and seek higher ground.
- Plan alternatives in advance. If the southeast wind strengthens, reroute away from exposed river bars and choose more sheltered sections, even if it means a little extra travel time or one more camp stop.
- Keep your cooking setup safe and contained: cook downstream of tents and away from tinder-dry vegetation; steam and heat should be directed away from windward sides to prevent flare-ups during changes in weather.
Emergencies
- Carry a reliable communications device and register a plan with a trusted contact: share your route, daily milestones, and estimated arrival times.
- In trouble, stop, assess, and call for help if you cannot self-rescue. Use 111 for emergencies in New Zealand and activate a satellite messenger or beacon if cell service is absent.
- Keep a compact first-aid kit, a whistle, and a signal mirror accessible. Use them to attract attention if you’re immobilized or separated from your group.
- Provide clear location data when requesting help: nearest river, notable landmarks, and any identifying features such as Reinga’s coastline or named tracks you’re following.
- Coordinate with locals or fellow travelers; talks with them can reveal safer detours or recent river conditions that are not yet posted.
Practical prep: five core checks for safe navigation
- Weather forecast and river status updated daily.
- Group readiness: gear secured, waterproofing confirmed, and a mutual crossing protocol in place.
- Alternate routes identified near major river segments and coastlines, especially near islands and cape tips like Reinga.
- Emergency plan rehearsed: where to meet, how to send coordinates, and what information to provide rescuers.
- Cooking and rest planning aligned with safety: keep fuel closed to sleeping areas, and choose wind-protected spots to avoid steam and smoke drifting into tents.
Logistics and Budget: Resupply Points, Permits, and Cost-Saving Tactics
Resupply cadence: 4–6 days, anchored by towns with reliable grocery stores and public transport to keep trips efficient.
North Island resupply points span Auckland, Hamilton, Taupo, Tauranga, and Wellington, with Wellington serving as a major pivot for southern sections. South Island stops cluster Christchurch, Dunedin, Queenstown, Wanaka, Nelson, Blenheim, and Te Anau, with smaller towns like Motueka and Picton offering backup supplies. Plan ahead so a front-row stop for shopping aligns with a weather window and a rest day; those choices keep mileage steady and spending predictable.
Permits and bookings: Most backcountry routes require no permit beyond hut bookings, but iconic tracks such as Milford, Routeburn, and Kepler demand pre-arranged hut nights. Reserve as early as five months ahead in peak season; hut fees generally run NZ$15–25 per person per night, with booking and administration fees adding NZ$5–15 per booking. If you’re self-contained and prefer camping, you can reduce accommodation costs, but verify park rules and water sources in advance.
Cost-saving tactics: five concrete approaches help you limit spend without sacrificing safety. First, cook every day using a compact one-pot setup; your cooking plan cuts external meal costs and reduces waste. Second, buy in bulk at city markets or supermarkets and split ingredients with a trekking partner to lower per-person prices. Third, choose huts with shared kitchens or camp where permitted to avoid higher lodge rates, and keep an emergency fund for occasional transfers between towns. Fourth, carry a lightweight, reusable water filter and refill at reliable sources rather than buying bottled water at every stop. Fifth, consider a Backcountry Hut Pass if you’ll use huts across multiple regions; it often lowers long-term hut costs versus paying per night.
Budget example you can adapt: plan for typical hut fees of NZ$20 per night, plus a NZ$15 booking fee on peak routes; groceries for five days of cooking for two often come in under NZ$60–90, depending on preferences. If you’ve traveled abroad before, you’ll notice the value of planning: those deliberate purchases in Wellington before the mountain crossing save money later and prevent over-spending in remote towns.
In practice, those lessons were learned by a friend, dakota, a city chef who turned from a daily routine to wilderness trips. He spent time abroad gathering tips and then shared a simple truth: preparation reduces risk and spending. Before every five-day stretch, he checked the plan, kept the gear tight, and cooked with affordable staples so the end of each leg felt positive rather than costly. The event of crossing the island demands discipline, but the process is clearly manageable when you treat resupply points as fixed anchors rather than surprises. Basically, you’ll end with a lighter pack, steadier budget, and more time to enjoy the ending in the wilderness rather than worrying about where the next meal comes from.
Takeaways for Women Travelers: Jessica Nabongo’s Global Cookbook and Senegal House-Hunting Episode
Plan two anchor experiences: a kitchen swap inspired by Jessica Nabongo’s Global Cookbook and a Senegal house-hunting episode to gauge living spaces, budgets, and community warmth at the destination before December travel peaks.
Three concrete takeaways for women travelers
- talking with local chefs and hosts builds trust, gives you exactly the ideas about ingredients you need, safety, and schedules; youve learned that meals on the road are social exchanges, not chores, and you see what happened when generosity meets curiosity.
- in araroa markets or street stalls, try a lamb dish and discuss sourcing with a neighbor, perhaps through a binyebwa translator; write down the steps in your travel notebook so you can recreate at a hotel kitchen or back home, and you know where to find similar flavors on different trips.
- the Senegal house-hunting episode shows how to assess a front door, utilities, water access, and neighborhood rhythm; you knew to look for who lives nearby, where families gather, and how the space supports daily life, using this front-porch check to choose a safe, welcoming destination for a long stay.
- develop your figure as a confident traveler by setting boundaries, asking clear questions, and honoring different needs; traveling with intent lets you make room for listening and growth while you explore oceans, cloud views, and wilderness alike.
Additionally, plan ahead with a flexible budget and a cloud-backed journal; you think of eating as exploration, quite often a doorway to culture, and you live the lesson that learning happens beyond comfort zones, along oceans and wilderness alike. December anchors can help you became more intentional about where you go; this is not about competition, only connection. Think of each stay as a learning moment. Acknowledge mortal limits and respect rest days as you explore.


