
 Homemade Manti – Traditional Turkish Dumplings Recipe" >
Start by kneading 2 cups flour with 1/2 cup warm water and 1 teaspoon salt until the dough is firm and elastic. Let it rest 30 minutes to relax gluten, improving performance when you roll and fill in batches. This setup helps keep the pockets from tearing once they are cooked.
For the filling, choose ground lamb or beef with onion, parsley, and pepper to boost proteína content. Mix with a little salt and oil, then sem overmixing so the texture stays tender. In a large bowl, combine 300 g meat with 1 finely chopped onion, 1/4 cup parsley, and a pinch of cumin; this needs time to mingle, and it should sit for 10 minutes. The family love the aroma when the filling is prepared ahead, and partners online often swap tips to save tempo.
Roll the dough to about 1 mm, cut into 4 cm squares, place a teaspoon of filling, and seal edges tightly. The large batches can rest on a floured surface, and heat should be moderate to keep from tearing. Bring a pot of salted water to a boil; then add pockets in batches and cook for 6-8 minutes, until they float and are cooked. Keep the water level below the rim to prevent spillover and sticking.
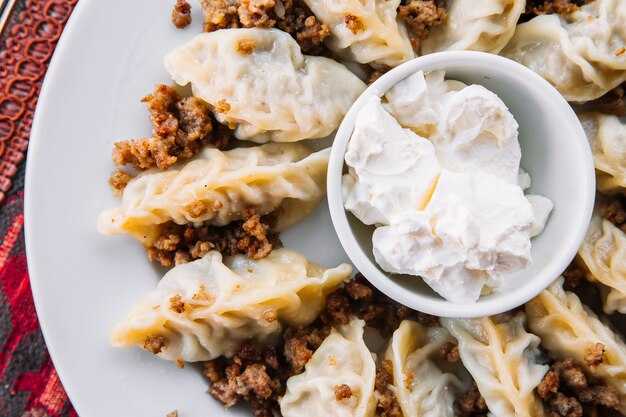
Serve with a tangy yogurt sauce. Stir in greek yogurt with garlic, lemon, and dill; this unique pairing boosts flavor and enhances eating experiences at the table. For many, the staple bites become a weekend tempo favorite, shared with family e partners online. Leftovers store below 3 days in the fridge and reheat gently with a splash of water to keep the pockets plump. olsun
Storage and freshness for Homemade Manti: from kitchen to fridge or freezer
Flash-freeze four hours in a single layer on a parchment-lined tray, then transfer to airtight bags. Label with the date and “manti-inspired” to simplify rotation in a busy home kitchen.
In the fridge, after the parcels cool, stack them in an airtight container with parchment between layers. Refrigerate up to 48 hours; keep the container topped with a light drizzle of oil to prevent sticking. Use each piece promptly and avoid overcrowding to maintain texture and color.
For longer storage, distribute the portions on a sheet and freeze until solid, then move them to a sturdy freezer bag or container. This method preserves texture and prevents clumping, and the items remain usable for up to three months. Label clearly to aid prospective cooks and streamline future menus.
When cooking from frozen, bring a large pot of salted water to a rolling boil, drop the frozen pieces, and cook until they float and the wrappers are tender–typically 6–8 minutes from frozen, a bit less if they were thawed first. This approach minimizes risk and reduces overall effort.
Finish with a simple topping: a quick tomato sauce made from chopped tomatoes, garlic, and a splash of olive oil, plus a 1–2 tbsp sprinkle of fresh herbs. Serve with a dollop of yogurt and a pinch of fresh herbs; the combination is frequently topped on plates and distributes evenly across servings. For a visually appealing plate, place them on a flat roll of warm bread or along the edge of a shallow dish, as seen in many chefs’ tips in a magazine feature.
Tips for home cooks include keeping the process minimal, using the same method each time, and keeping a small reserve for online posts–instagram photos tend to boost engagement. FAQs from affiliate partners and magazine staff highlight that these items can be stored safely, used across four-day windows in meal plans, and integrated into varied menus. Traditionally prepared and handled with care, they remain flavorful and safe when stored properly; olsun to your kitchen efforts.
Cooked vs. raw: when to store and shelf life
Best practice: cook the pockets until centers are firm, then cool for 10–15 minutes before refrigerating or freezing. Do not leave cooked portions at room temperature longer than 2 hours. This approach yields a smooth texture and balanced flavor with minimal effort.
Raw dough can be stored briefly; refrigerate for up to 24 hours or freeze for 1–2 months. When freezing, portions should be distributed into servings and placed between sheets of paper to prevent sticking and help maintain shape. Avoid time-consuming thawing at room temperature; thaw in the fridge when you plan to cook later.
To support reliable making and diverse profiles, follow directions and label containers with the date. Suggest keeping a photo note or quick photo guide to track progress, and plan around daily meal rhythms for best ratings.
In practice, portions should be distributed evenly and turned halfway through cooling to ensure even surface and quick chilling. A photo guide helps visualize these steps, but the core is proper timing and storage. If you plan to pair the bites with a mint salad, store greens separately to maintain freshness.
Ingredient tip: for a ground–meat filling, choose finley ground meat to ensure smooth texture; add mint for brightness after cooking. When you make every batch, keep an eye on the balance between effort and flavor; this balanced approach travels well across meals and keeps daily menus flexible.
For broader reach, avoiding time-consuming missteps helps ratings stay steady; the goal is practical, repeatable storage that follows safe temperatures. A simple table below summarizes options and the turn you should take at each stage.
| State / Action | Temp | Time | Notas |
|---|---|---|---|
| Raw dough, refrigerated | 4 C (39°F) | up to 24 hours | divide into servings; wrap in paper; best used for shaping soon |
| Raw dough, frozen | -18 C (-0°F) | up to 2 months | thaw in fridge overnight; re-check texture |
| Cooked pockets, refrigerated | 4 C (39°F) | up to 3 days | cool within 2 hours; reheat by steaming or gentle simmer; turn halfway when storing |
| Cooked pockets, frozen | -18 C (-0°F) | up to 3 months | cool quickly; wrap tightly; thaw in fridge before reheating |
Container choices and packaging to prevent moisture loss
Use airtight, non-reactive glass or BPA-free plastic containers with tight lids to prevent moisture loss, and store portions flat to minimize surface exposure.
- Container types: bowl, glass jars, e rectangular plastic containers with secure seals work best for keeping the steamed pockets hydrated. For long-term storage, vacuum bags provide the strongest barrier against evaporation and freezer burn.
- Layering approach: Line each layer with parchment or lightly floured parchment to prevent sticking; place a thin barrier between layers so surfaces stay smooth and easy to separate later. Dust the surface finley with flour to form a micro-barrier against moisture exchange.
- Cooling before packaging: If the filling contains onions, cool completely before sealing to avoid condensation inside the container. This step helps maintain texture and prevents sogginess over time.
- Freezing protocol: Wrap individual parcels in parchment, then stack into a freezer bag and store with the air pressed out. Lay them flat to freeze quickly and evenly, which preserves flavorful profiles.
- Alternative sealing: A vacuum seal yields the best moisture retention, but avoid compressing delicate shapes; use gentle suction and place items in a protective layer to keep form intact.
- Edge care and paste: If you use sauces or garlic paste in fillings, ensure complete cooling before packaging to prevent steam buildup inside seals. Label each package with the ingredient list and date for easy tracking.
- Thawing and reheating: Move from store to fridge into a shallow tray overnight, then reheat on ocak or steam gently until heated through. Serve amazing parcels with yogurt, sauces, or herbs for a fotografia-worthy presentation.
- Time and regional notes: In the region e country where this dish is popular, simple, airtight packaging supports a quicker post-purchase turnover. The источник stresses moisture control to keep texture intact for up to 2–3 days in refrigeration or 2–3 months frozen, depending on packaging quality.
This practice helps you aprender the best way to keep flavor intact, receive consistent results, and maintain a crisp bite from the ingredient mix until you serve. It’s easy to manage, easy to scale, and unique for presenting the dish in a way that appeals to both everyday meals and viral social posts, keeping the dish diet-friendly options clearly delineated.
Fridge storage for cooked manti: time, temperature, and reheating tips
Store the cooled parcels at 4°C (39°F) or colder and refrigerate within two hours of cooking to preserve texture and safety.
In the fridge, use airtight containers or wrap tightly; plan for a shelf life of 3–4 days. To avoid cross-flavoring, separate onions or aromatic additions and label the storage with date.
For longer storage, freeze flat on a tray until firm, then transfer to a labeled container or resealable bag. This preserves quality for 2–3 months; thaw in the fridge overnight before reheating.
Thawing: move from freezer to fridge and allow 6–8 hours for individual portions, or overnight for larger portions; do not thaw at room temperature.
Stovetop reheating: place portions in a saucepan with a splash of water or yogurt sauce; simmer 6–8 minutes, turning occasionally until the center reaches 74°C (165°F).
Oven method: preheat to 180°C (350°F); spread on a tray, cover loosely with foil, and reheat 10–15 minutes. Uncover for the final 2–3 minutes to restore a light thick edge and preserve flavours.
Microwave method: arrange portions with a little liquid in a microwave-safe dish, cover, and heat on medium (50–60%) for 2–4 minutes, stirring halfway. Let rest 1–2 minutes before eating to ensure even heat and well-distributed nutrition.
Serving ideas: finish with yogurt, crumbled corbasi, or a drizzle of grape syrup; these additions boost nutrition and flavours when you eat together from region-focused menus. For added balance, include a spice paste and chopped onions to enhance the flavour profile and performance over meals.
Freezing raw dough and filling: preparation and freezing method
Freeze dough and filling right after mixing for best texture; portion into discs or squares and space them between parchment sheets before freezing to prevent sticking.
For the dough, use 250 g flour, a pinch of salt, one large egg, and about 60 ml cold water plus 1 tsp olive oil. Knead until the mass is firm and smooth, then rest 20 minutes covered. Roll to a medium-thin sheet and cut into roughly 4–5 cm squares. Keep surfaces lightly floured to avoid tearing; this keeps the content intact and the flavor focused.
Filling should be prepared with chopped onion, parsley, and your choice of protein or vegetables. A typical mix: 250 g minced meat, 1 small onion finely chopped, 2 tbsp chopped parsley, 1/2 tsp pepper, 1/2 tsp salt. Sauté onion until translucent, cool, then combine with meat. This chopped mix stores well and pairs with a savory, manti-inspired style.
Assemble and freeze in two stages: first lay out dough squares, place about 1 tsp filling in the center, then seal edges with a touch of water to create a tight edge. Freeze the assembled pockets on a parchment-lined tray until solid (2–4 hours), then transfer to airtight bags or containers. Label with date; this method minimizes ice crystals and preserves total flavor for later eating.
Optionally freeze raw dough sheets separately from the filling for added flexibility. Wrap dough portions tightly in plastic or foil, then stack in a freezer bag. For longer storage, dough and filling can be kept separately for up to 3 months; this is convenient for prospective cooks who want to cook on demand without extra effort.
Storage and handling notes: freeze in small batches to keep even cooking times; avoid stacking heavy items on top, which can deform edges. If you plan to bake rather than boil, keep a separate batch of dough ready for baking in istanbul-inspired kitchen routines, as baking preserves a crisp exterior.
Cooking from frozen: drop directly into salted boiling water (do not thaw first) and cook until the pockets float and the dough is tender, usually 6–8 minutes. As an alternative, you can bake at 200°C for 12–15 minutes until edges are golden. Both methods keep the middle juicy and the outer layer pleasantly firm, serving a versatile flavor profile for any medium- or strong-flavored sauce.
Serving ideas: pair with a light salad and a yogurt-based sauce; note how the bite remains balanced between filling and dough, and how the flavor profile stays bright even after freezing. Share your plated content on instagram to inspire followers who love manti-inspired pockets and the country-style pairing of yogurt and herbs.
faqs: When to freeze? Right after preparing and shaping for best texture. Can you freeze layers of raw dough and filling together? Yes, but freezing separately minimizes moisture transfer. How long does it last? Up to 3 months in proper cold storage. Can you re-freeze after thawing? Best to avoid; freeze in portions and reheat only once for best texture. The mother-in-law’s trick is to layer the frozen items on a single tray for uniform freezing, then transfer to bags for easy portioning while maintaining flavor and content quality.
Freezing cooked manti: best practices to preserve texture and flavor
Cool completely after cooking, then portion into single-serving sizes and flash-freeze on a parchment-lined tray until firm. Transfer to airtight containers or resealable bags, remove air, and label with the date. Uniform size ensures even heating and prevents overcooking, preserving the final bite and keeping the filling intact.
Freeze in layers separated by parchment; this keeps moisture inside and prevents ice crystals from forming on the wrapper. When stacking is needed, limit layers and store in flat, rigid containers to maintain size and texture. This approach respects oklava-inspired handling, supports asli flavor profiles, and makes later cooking straightforward.
When you reheat from frozen, use a gentle simmer in stock or soup and avoid boiling. 5-8 minutes usually suffices; add a splash of water to keep the surface moist and to meld flavors. For a cookingorgeous result, follow low heat with steady coverage and a quiet simmer, which helps the filling meld with the surrounding liquid without turning the wrapper mushy.
Storage can keep quality for about 1-2 months; after that, texture may drift but eating remains safe. This method suits a protein-forward diet and pairs well with vegetables, with broth-based soups extending its use into a complete, flavorful content bowl. If you plan to use these pieces in lasagna or macaroni dishes, cut them into small parts so they blend with sauces and cheese, preserving their flavor.


